# 20150429: exaBGPとRabbitMQで遊ぶ
モチベーション
RabbitMQがすごいと思うので、なにか使ってみたいと思った。 ちょうど、同時に、exaBGPの記事を書きかけであったことを思い出していた。
メッセージキューだけで操作しても、オブジェクトを遊んでいるだけなのでなにも面白くない。 ユーザアプリケーションと通信する手段を考えたいと思っていたので、 exaBGPと連携した何かを作ることにした。
exaBGP
exaBGPはJuniperライクなコンフィグレーションで設定可能な BGPのエミュレータである。 exaBGPはLinuxベースのコンピュータ上でBGPデーモンとして 振る舞うことができる。 また、複数のpeerを模擬することができる。
exabgpにおいて特徴的な機能として、 UPDATEメッセージや WITHDRAWメッセージ受信時にprogramというステートメントを用いて、 経路の更新があった際に外部プログラムにイベントを発生させることができる。 また、逆に、外部プログラムからの命令で経路の広告内容を変えることもできる。
基本的に、exaBGPは「イベントが発生した時に挙動」を起こすことは簡単だが、 「外部から経路を操作する」には、プログラム側で工夫してやる必要がある。 簡単なexaBGPの外部との連携を図に示す。
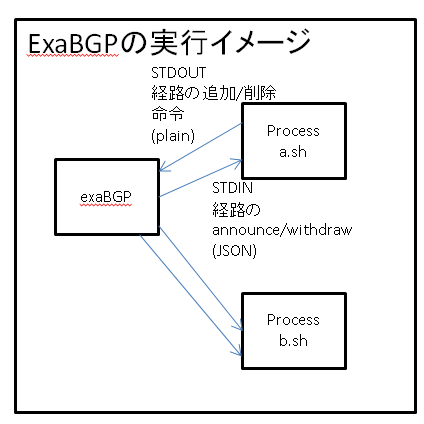
exaBGPはneighborやneighbor group毎に1つあるいは複数の外部プログラムを 設定できる。 経路だけを例にとると、exaBGPがpeerがら受け取ったupdateは外部プログラム的に 標準入力としてJSON形式で渡される。 逆に、外部プログラム的にSTDOUTとして命令(announce <prefix>など、JSONではない) を渡すとexaBGPはBGPでその対象のpeerにupdateを送る。
たとえば、命令の例としては(疑似的なコードとして)
i = 0
while(1){
 print("announce 192.168.0.i/32 next-hop 192.168.100.i")
 sleep(1)
}
のようなコードを外部で動かすと192.168.0.{1,2,3…}という経路が 1秒ごとにexaBGP経由でpeerにupdateされることになる。
問題点
任意の経路情報をstdoutで突っ込めるというのは面白いが、 上記の例ならともかく、「何かをトリガに」しようとすると、 外部プログラムは「さらに別の外部からの」入力をハンドルする必要がある。
設計
今回は、次のようなシナリオでアプリケーションを作る。
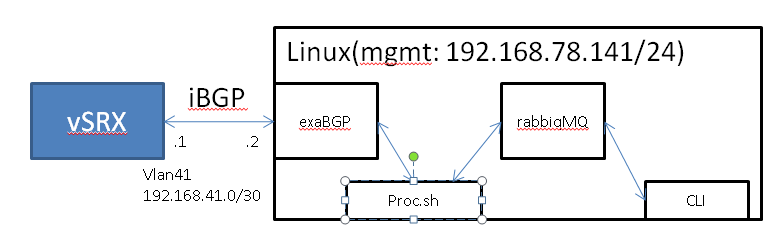
vSRX: 外部のルータ
exaBGP: ルータとだけpeerを張っている
proc.sh: exaBGPの外部プログラム
rabbitMQ: exaBGPと同ホスト上で動くメッセージキューサーバ
CLI: キューを読み書きする。ユーザとCLIでコミュニケーションする。
これによって、オペレータは好きなタイミングで経路情報を読み書きできる。
設定
単なるUNIXのインストールメモ。
eth0: NAT I/F(dhcp)
eth1: mgmt
eth2: DataPlane(vlan41)

sudo apt-get install openssh-server vlan
sudo vi /etc/network/interfaces
> 以下のように書き換える
--
# NAT用(外部に到達するための)ネットワーク
auto eth0
iface eth0 inet dhcp

# mgmt用ネットワーク
auto eth1
iface eth1 inet static
address 192.168.78.41
netmask 255.255.255.0

# vlanのparent I/F
auto eth2
iface eth2 inet manual
# vlan interfaceの設定
auto eth2.41
iface eth2.41 inet static
address 192.168.41.2
netmask 255.255.255.252
--
ルータ側の設定
Juniperだと以下のようなConfigをいれた。 ポイントはAS65000であることと、capabilityはinet.0だけ。
set interfaces ge-0/0/1 unit 41 vlan-id 41
set interfaces ge-0/0/1 unit 41 family inet address 192.168.41.1/30
set routing-options autonomous-system 65000
set protocols bgp group exabgp type internal
set protocols bgp group exabgp local-address 192.168.41.1
set protocols bgp group exabgp family inet unicast
# 以下を入れるとなぜかrunができないのでこのままにする
# exaBGPがrtかinet-flow.0をうまく処理できていない?
#set protocols bgp group exabgp family inet flow
#set protocols bgp group exabgp family route-target
set protocols bgp group exabgp neighbor 192.168.41.2
set protocols bgp group exabgp export bgp-adv-static
set policy-options policy-statement bgp-adv-static term 10 from protocol static
set policy-options policy-statement bgp-adv-static term 10 then accept
set routing-options static route 192.168.41.4/32 discard
exaBGPとルータの確認
以上で、exaBGPの対向の準備ができたので、exaBGPを入れていく。
sudo sed -i".orig" -e 's/\/\/us.archive.ubuntu.com/\/\/ftp.jaist.ac.jp/g'  /etc/apt/sources.list
apt-get update
apt-get install python-setuptools
easy_install pip
# pipからではなく、aptでも良いが、バージョンが古いため、pipからが妥当
pip install exabgp

# exaBGPテスト用設定ファイルの作成
cat<<EOF>test
neighbor 192.168.41.1 {
   router-id 192.168.41.2;
   local-address 192.168.41.2;
   local-as 65000;
   peer-as 65000;
   graceful-restart;
   static {
       route 10.6.0.0/16 next-hop 192.168.41.2;
   }
}
EOF
# 以下で起動する。--configなどは必要なく、引数に設定ファイルをいれれば良い
exabgp test

# ルータ側で確認すると、Config中の経路を受け取っていることが分かる
kanai@FF1> show route receive-protocol bgp 192.168.41.2
inet.0: 13 destinations, 13 routes (12 active, 0 holddown, 1 hidden)
  Prefix                  Nexthop              MED     Lclpref    AS path
* 10.6.0.0/16             192.168.41.2                 100        I
# また、config的に、static経路を広告するようにしているので
# staticで指定している1経路が広告されていることがわかる
kanai@FF1> show route advertising-protocol bgp 192.168.41.2
inet.0: 13 destinations, 13 routes (12 active, 0 holddown, 1 hidden)
  Prefix                  Nexthop              MED     Lclpref    AS path
* 192.168.41.4/32         Self                         100        I
以上でexaBGPは外部ルータとつなげた。
外部プログラム
先に述べたように、exaBGPではpeer先からのupdateをトリガとして何らかの動作を起こせる。 (尚、ここでは対象としていないが、neighborのdown/upなどもトリガとできる。
ここで、以下のようなexabgpの設定ファイルを作る。
 1group a{
 2 process network-routes {
 3  receive {
 4   update;
 5   parsed;
 6  }
 7   run /root/output.run;
 8   encoder json;
 9 }
10 neighbor 192.168.41.1 {
11  router-id 192.168.41.2;
12  local-address 192.168.41.2;
13  local-as 65000;
14  peer-as 65000;
15  graceful-restart;
16  static {
17   route 10.6.0.0/16 next-hop 192.168.41.2;
18  }
19 }
20}
この例では、groupを作り、そこに、トリガの定義と発生したときに呼ぶスクリプトに対してSTDINでメッセージが送られる。
output.runは以下のスクリプトだ。
1#!/usr/bin/python
2import sys
3f = open('/tmp/log', 'aw')
4line = sys.stdin.readline().strip()
5while True:
6    f.write(line)
7    f.flush()
8    line = sys.stdin.readline().strip()
9f.close()
これを実行すると、BGP peerの経路が変わるたびに 以下で示すようなJSONが送られてくる。
尚、プログラムを見ると分かる通り、プログラムはwhile 1でSTDINの入力を受け付ける。 exaBGPは、トリガが発生していなくても、起動した際にそのスクリプトをプロセスとして実行し、 常駐させる。 つまり、while1しないで終了してしまうと、その時点で、不正なトリガ(宛先がいないトリガ)となってしまう。
updateのHSON
 1{
 2    "exabgp": "3.4.8",
 3    "time": 1430306664,
 4    "host": "ubuntu",
 5    "pid": "51916",
 6    "ppid": "4737",
 7    "type": "update",
 8    "neighbor": {
 9        "ip": "192.168.41.1",
10        "address": {
11            "local": "192.168.41.2",
12            "peer": "192.168.41.1"
13        },
14        "asn": {
15            "local": "65000",
16            "peer": "65000"
17        },
18        "message": {
19            "update": {
20                "attribute": {
21                    "origin": "igp",
22                    "local-preference": 100
23                },
24                "announce": {
25                    "ipv4 unicast": {
26                        "192.168.41.1": {
27                            "192.168.41.5/32": {
28
29                            }
30                        }
31                    }
32                }
33            }
34        }
35    }
36 }
withdrawのJSON
 1 {
 2    "exabgp": "3.4.8",
 3    "time": 1430306817,
 4    "host": "ubuntu",
 5    "pid": "51916",
 6    "ppid": "4737",
 7    "type": "update",
 8    "neighbor": {
 9        "ip": "192.168.41.1",
10        "address": {
11            "local": "192.168.41.2",
12            "peer": "192.168.41.1"
13        },
14        "asn": {
15            "local": "65000",
16            "peer": "65000"
17        },
18        "message": {
19            "update": {
20                "withdraw": {
21                    "ipv4 unicast": {
22                        "192.168.41.5/32": {}
23                    }
24                }
25            }
26        }
27    }
28 }
以上で、exaBGPの簡単なスクリプトについて述べた。
RabbitMQ
RabbitMQをインストールしていく。
http://ameblo.jp/principia-ca/entry-11233853011.html
apt-get install rabbitmq-server
rabbitmqctl status
# GUIのインストール
sudo rabbitmq-plugins enable rabbitmq_management
service rabbitmq-server restart
> http://192.168.78.41:15672/ にアクセス
> guest:guest
rabbitmqctl list_queues name messages_ready
> キューがないことを確認
pip install pika
apt-get install python-setuptools git-core
以下のコードは少しサンプルを書き換えたもので、 標準入力から受け取った文字列をどんどんキューに積みます。
 1#!/usr/bin/env python
 2import pika
 3import sys
 4
 5connection = pika.BlockingConnection(pika.ConnectionParameters('localhost'))
 6channel = connection.channel()
 7channel.queue_declare(queue='hello')
 8
 9ln = "a"
10while ln != "":
11  ln = sys.stdin.readline().strip()
12  channel.basic_publish(exchange='',
13                        routing_key='hello',
14                        body=ln)
15connection.close()
これを実行して、キューに何か文字を積みます。
./mq_1_send.py
hogehoge
(ctl+d)
rabbitmqctl list_queues name messages_ready
Listing queues ...
hello   1
...done.
> これで、helloというqueueにメッセージが1つ入ったことが分かる。
 1#!/usr/bin/env python
 2import pika
 3
 4connection = pika.BlockingConnection(pika.ConnectionParameters(host='localhost'))
 5channel = connection.channel()
 6
 7channel.queue_declare(queue='hello')
 8
 9print ' [*] Waiting for messages. To exit press CTRL+C'
10
11def callback(ch, method, properties, body):
12    print " [x] Received %r" % (body,)
13
14channel.basic_consume(callback,
15                      queue='hello',
16                      no_ack=True)
17
18channel.start_consuming()
./mq_1_recv.py
[*] Waiting for messages. To exit press CTRL+C
[x] Received 'hogehoge'
> キューに入ったメッセージを読み取った
これで、他のウィンドウからsendするとどんどん値が出てくる。 また、この状態で、rabbitmqctl list_queues name messages_ready を実行すればqueueのカウンタは0になっている。
組み合わせてみる
設計
サーバ側はexaBGPのprocessとして動作させる。 それで、プロセスはforkして、mqから受け取った文字列は そのままexaBGP側に通す。 exaBGPからきたメッセージはJSONを解釈して返す。とします。 今回は簡単にするため、exaBGPからのメッセージは、 announce <prefix>とwithdraw <prefix>だけにします。 exaBGPのコマンドは以下の通りe(今回使うものだけ)。
announce route 1.1.0.0/24 next-hop 192.168.41.2
withdraw route 1.1.0.0/24 next-hop 192.168.41.2
まず、常駐させるスクリプトとしてmq.runを作る。
 1#!/usr/bin/python
 2# -*- coding: utf-8 -*-
 3
 4import sys
 5import pika
 6import threading
 7import json
 8
 9class MQThread(threading.Thread):
10    def __init__(self):
11        threading.Thread.__init__(self)
12
13    def callback(self, ch, method, properties, body):
14        sys.stdout.write(body + "\n\n")
15        sys.stdout.flush()
16
17    def run(self):
18        connection = pika.BlockingConnection(pika.ConnectionParameters(host='localhost'))
19        channel = connection.channel()
20        channel.queue_declare(queue='to-exabgp')
21        channel.basic_consume(self.callback, queue='to-exabgp', no_ack=True)
22        channel.start_consuming()
23
24if __name__ == "__main__":
25    th = MQThread()
26    th.start()
27
28    connection = pika.BlockingConnection(pika.ConnectionParameters('localhost'))
29    channel = connection.channel()
30    channel.queue_declare(queue='from-exabgp')
31    mq_send = lambda x: channel.basic_publish(exchange='',routing_key='from-exabgp', body=x)
32
33    line = "start"
34    while line != "":
35        line = sys.stdin.readline().strip()
36        dat = json.loads(line)
37        if dat["type"] == "update" and "update" in dat["neighbor"]["message"]:
38            msg = dat["neighbor"]["message"]["update"]
39            if "announce" in msg:
40                if "ipv4 unicast" in msg["announce"]:
41                    for nh in msg["announce"]["ipv4 unicast"]:
42                        for route in msg["announce"]["ipv4 unicast"][nh]:
43                            mq_send("announce " + route)
44            if "withdraw" in msg:
45                if "ipv4 unicast" in msg["withdraw"]:
46                    for route in msg["withdraw"]["ipv4 unicast"]:
47                        mq_send("withdraw " + route)
次に、CLI側(mqからメッセージを受け取ったり、ユーザがメッセージを入れるインタフェース) をmq.pyとして生成する。
 1#!/usr/bin/env python
 2import pika
 3import sys
 4import threading
 5
 6
 7class MQThread(threading.Thread):
 8    def __init__(self):
 9        threading.Thread.__init__(self)
10
11    def callback(self, ch, method, properties, body):
12        sys.stdout.write("[recv]" + body + "\n")
13        sys.stdout.flush()
14
15    def run(self):
16        connection = pika.BlockingConnection(pika.ConnectionParameters(host='localhost'))
17        channel = connection.channel()
18        channel.queue_declare(queue='from-exabgp')
19        channel.basic_consume(self.callback, queue='from-exabgp', no_ack=True)
20        channel.start_consuming()
21
22
23
24if __name__ == "__main__":
25    th = MQThread()
26    th.start()
27
28    connection = pika.BlockingConnection(pika.ConnectionParameters('localhost'))
29    channel = connection.channel()
30    channel.queue_declare(queue='to-exabgp')
31
32    ln = "a"
33    while ln != "":
34      ln = sys.stdin.readline().strip()
35      channel.basic_publish(exchange='',
36                            routing_key='to-exabgp',
37                            body=ln)
38    connection.close()
実行例を次に示す。
exabgpで上のmq.runをrunの対象としておいてから別のウィンドウで
./mq.py
[recv]announce 192.168.41.4/32
> まず、peerup時にannounceされた経路が降ってくる
announce route 1.1.0.0/24 next-hop 192.168.41.2
> 広告を命令する
> show route receive-protocol bgp 192.168.41.2
> * 1.1.0.0/24              192.168.41.2                 100        I
> * 10.6.0.0/16             192.168.41.2                 100        I
> 増えたことがわかる
withdraw route 1.1.0.0/24 next-hop 192.168.41.2
> 広告を消す
> show route receive-protocol bgp 192.168.41.2
> * 10.6.0.0/16             192.168.41.2                 100        I
> 消えたことがわかる

> 次にルータ側で
> set routing-options static route 192.168.41.5/32 discard;
[recv]announce 192.168.41.5/32
> exaBGPに対して広告されたことが分かる

> delete routing-options static route 192.168.41.5/32 discard;
[recv]withdraw 192.168.41.5/32
> exaBGPに対してwithdrawが広告されたことが分かる
考察
今回は、exaBGPとRabbitMQを組み合わせた経路インジェクタのようなものを作った。 このようなインタフェースを作成しようとするとローカルで動作させるにしてもプロセス間通信が必要になるし、 リモートで制御しようとするとソケットプログラミングが必要となる。
メッセージキューはそれらをカプセリングしてペイロードの受け渡しだけを気にすれば良くしてくれる。 特に、プロセス間通信やソケット通信はシステムの構成や他のプログラムとの干渉などが発生する場合があるが、 メッセージキューはそれらがない。
また、非同期であることも大切で、メッセージキューは同期する必要がないので、ブロッキングしうる処理に向く。
総じて、モジュール間の連携が疎になることが最も大きな特徴である。 今回の場合は、exaBGPへのほぼrawなメッセージの送受信だけを行うモジュールと、 CLIとの入出力を行うモジュールを作ったが、それぞれは独立している。
結合が疎であることは、設計、分散開発に向くだけではなく、デバッグ性も高い。
尚、今回は特に触れていないが、MQはタイムアウト、ack, nackの仕組みや、 また、分散キューイングなどが行える。 ただ、それらを用いないとしても、非同期なネットワーク間の メッセージ通信ができる利点は非常に大きい。
本当はもっと同期しない通信であったり、処理に時間がかかるといいんだけど、今回はこれで。
参考
https://www.rabbitmq.com/tutorials/tutorial-one-python.html
https://github.com/Exa-Networks/exabgp/wiki/Controlling-ExaBGP-:-_-README-first